OpenCV with Azure Functions and Python
Disclaimer: This post was originally posted in Dev.to. Link.
I wrote it to participate in a contest made by Microsoft in the Dev.to platform.
Introduction
Have you ever though about deploying your custom Python + OpenCV projects in a cheap and easy-to-use platform? Read this post and find a way to do it using Azure Functions, the serverless compute service available at Microsoft Azure cloud.
In this tutorial I'll show you how to develop a simple Python application that uses the built-in Canny function to detect edges in images submitted by clients.
Like mentioned before, this project will be deployed in Azure Functions, where the client should submit an image through a POST HTTP endpoint, that is later manipulated by our Python script to extract its edges and send back to the client the final cool result.
Alright, let's start then. The setup I used to develop this project consists of:
- Ubuntu 20.04 - OS;
- Node.js v14.17.0 and npm 7.14.0;
- Python 3.8.5 and pip 22.0.3;
- Azure CLI tool, (AKA
az) 2.31.0; - Insomnia (to trigger the endpoint, although you can use
curldirectly).
After installing the required tools (I suppose that you will be able to use newer versions, just give it a try), the first package you need to install is the azure-functions-core-tools using npm. Then, you could use it to start a new project:
# this command will install the required npm package
$ npm install -g azure-functions-core-tools
# later you can explore your global packages with
# npm ls --global

# next step is to start our project using some
# boilerplate to make it easier to develop
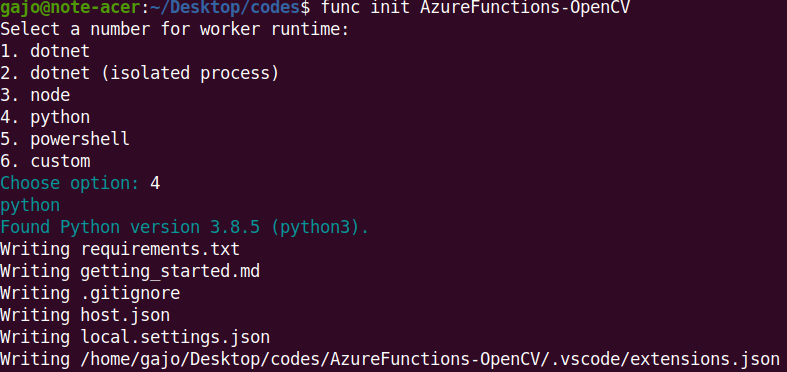
$ func init AzureFunctions-OpenCV
# select 4 for python project
After running those commands you will see a result like this on your screen:
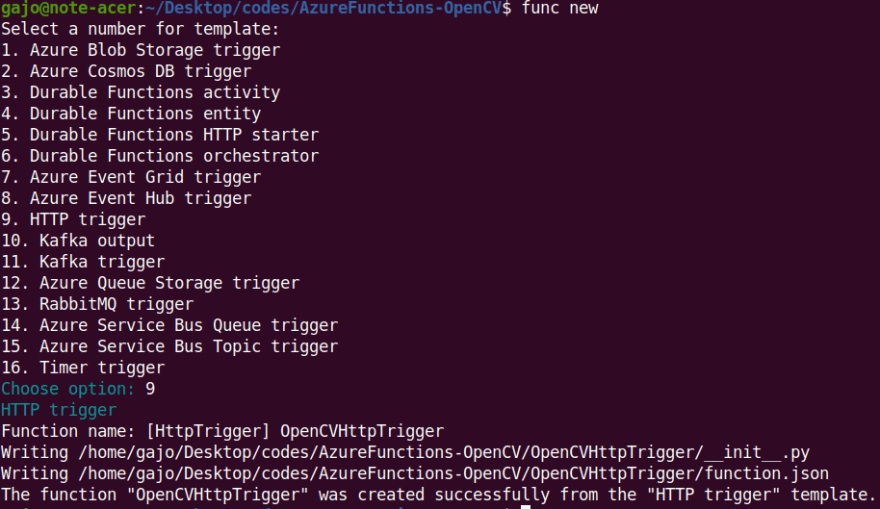
Next step is to add a template code to this project folder:
# move within the project folder
$ cd AzureFunctions-OpenCV/

# create a new template project
$ func new
# select the option 9 for HttpTrigger
Open this folder in your IDE (Integrated Development Environment) of preference. In my case I'll go with VS Code, although recently I'm experimenting with Emacs and I'm really liking it (I'll write about it in a future post).
Continuing, now you need to update the requirements.txt file, adding the required packages to deal with OpenCV using Python. Make sure that your local file have this content:
# Do not include azure-functions-worker as it may conflict with the Azure Functions platform

azure-functions==1.9.0
numpy==1.20.1
opencv-contrib-python==4.5.5.62
There we just added the numpy and opencv-contrib-python packages, setting those package versions we want to use (best practice to increase reproducibility). To install it locally you could use the following command in the terminal:
# install packages mentioned in requirements.txt
$ pip install -r requirements.txt
Now let's start exploring our real project. Its main program will be inside the OpenCVHttpTrigger/__init__.py file. To assert that it is working fine in your local environment, you could just change it's code to print the OpenCV version that is installed.
First, copy this script to the init.py file:
import logging

import azure.functions as func

# import opencv package
import cv2

def main(req: func.HttpRequest) -> func.HttpResponse:
    logging.info('Python HTTP trigger function processed a request.')
    # print OpenCV's version
    logging.info(f'OpenCV version: {cv2.__version__}')

    name = req.params.get('name')
    if not name:
        try:
            req_body = req.get_json()
        except ValueError:
            pass
        else:
            name = req_body.get('name')

    if name:
        return func.HttpResponse(f"Hello, {name}. This HTTP triggered function executed successfully.")
    else:
        return func.HttpResponse(
             "This HTTP triggered function executed successfully. Pass a name in the query string or in the request body for a personalized response.",
             status_code=200
        )
Make sure that your project and dependencies are cool and start this project using the following command in the terminal:
# start this project locally
$ func host start

# ................
# in a different terminal window
# while running the server
# check its GET endpoint using curl
$ curl http://localhost:7071/api/OpenCVHttpTrigger

# results in
This HTTP triggered function executed successfully. Pass a name in the query string or in the request body for a personalized response.
After reaching this endpoint you must see the following logs in the server:
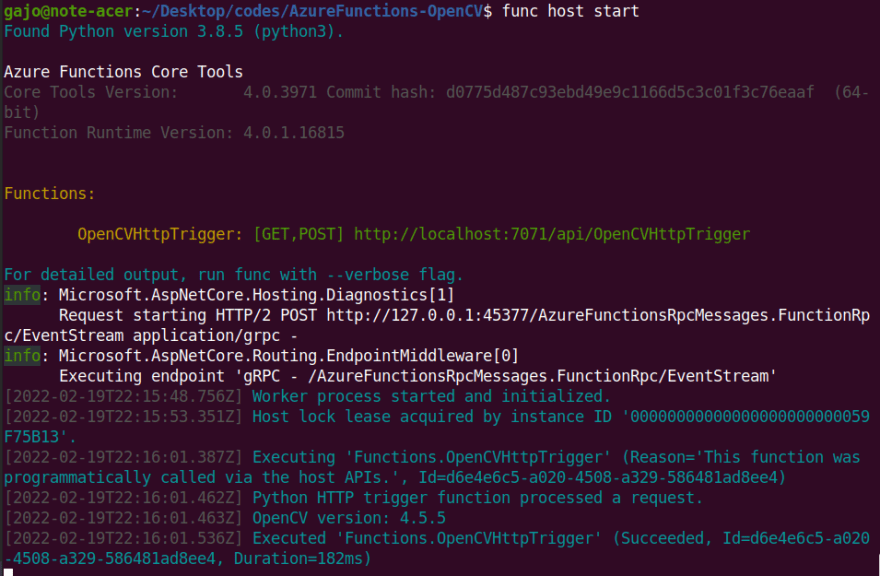
There's a line there saying OpenCV version: 4.5.5, that is what we want to appear for now.
Cool, dependencies are ok. Let's focus now on setting our local environment to trigger our future application endpoint.
In this tutorial I'll show you two ways to do this. First, with Insomnia, you'll have access to a pretty UI. Later, I'll show you how to use curl in the terminal directly.
Since this is not the main goal of this tutorial I will not cover in much details how to configure your Insomnia locally from scratch. In your environment, after making sure that this program is installed, you'll be able to just load my configuration and have access to the same endpoints.
Just check this GIF to see how I loaded the configuration JSON for my Insomnia instance.
Now, getting back to the Azure Functions, if you check the official docs there are those important information (reference link).
The HTTP request length is limited to 100 MB (104,857,600 bytes), and the URL length is limited to 4 KB (4,096 bytes). These limits are specified by the httpRuntime element of the runtime's Web.config file.
If a function that uses the HTTP trigger doesn't complete within 230 seconds, the Azure Load Balancer will time out and return an HTTP 502 error. The function will continue running but will be unable to return an HTTP response. For long-running functions, we recommend that you follow async patterns and return a location where you can ping the status of the request. For information about how long a function can run, see Scale and hosting - Consumption plan.
So, you need to make sure that your request length is not bigger than 100 MB and that the computation time is less than 230 seconds.
Since we are dealing with images and this Canny algorithm is relatively fast and lightweight, we are safe to go. Finally, let's start exploring the real project code (__init__.py):
import logging
import azure.functions as func

import cv2
import numpy as np

# https://stackoverflow.com/a/37032551
def loadImageFromRequestBody (
        req: func.HttpRequest) -> [np.uint8]:
    """Load image as uint8 array from the request body."""
    img_bin = req.get_body()
    img_buffer = np.asarray(bytearray(img_bin), dtype=np.uint8)
    return img_buffer

# https://docs.opencv.org/4.x/dd/d1a/group__imgproc__feature.html#ga04723e007ed888ddf11d9ba04e2232de
# cv.Canny(image, threshold1, threshold2[, edges[, apertureSize[, L2gradient]]]) -> edges
# cv.Canny(dx, dy, threshold1, threshold2[, edges[, L2gradient]]) -> edges
def extractEdges (
        buf: [np.uint8],
        threshold1: int,
        threshold2: int) -> [np.uint8]:
    """Tranform the input image to show its edges using the Canny algorithm."""
    img = cv2.imdecode(buf, cv2.IMREAD_GRAYSCALE)
    img_edges = cv2.Canny(img, threshold1, threshold2)
    return img_edges

def main(req: func.HttpRequest) -> func.HttpResponse:
    logging.info('Python HTTP trigger function processed a request.')

    # CONSTANTS
    THRESHOLD1 = 20
    THRESHOLD2 = 60

    img_buffer = loadImageFromRequestBody(req)
    img_edges = extractEdges(
        img_buffer, THRESHOLD1, THRESHOLD2)

    # Tips to debug locally
    # cv2.imshow('Image edges', img_edges)
    # cv2.waitKey(0)

    img_encoded = cv2.imencode('.jpg', img_edges)
    img_response = img_encoded[1].tobytes()

    # https://developer.mozilla.org/en-US/docs/Web/HTTP/Headers/Content-Disposition
    headers = {
        'Content-Type': 'image/jpeg',
        'Content-Disposition': 'attachment; filename="image.jpg"',
        'Access-Control-Allow_Origin': '*'
    }

    return func.HttpResponse(
        body=img_response,
        headers=headers,
        status_code=200)
As you can see, we have changed almost all the previous code. We are using type annotations to make it clear what our functions expect to receive and what it returns, we have links and comments related to those functions over the code in case you want to understand where I got the knowledge to build it and finally we have some docstrings to make it easier to reason about its functions.
According to this code, you should send the image as binary data in a POST request. Take a look at the following piece of code to understand how to use it with curl:
# start the function locally
$ func host start

# submit a local image:
$ curl --request POST \
  --url http://localhost:7071/api/OpenCVHttpTrigger \
  --header 'Content-Type: image/jpeg' \
  --data-binary '@/home/gajo/Pictures/myself-01.jpg' \
  --output ~/Desktop/image.jpg
In order to use this command you should have an image in the ~/Pictures directory with name myself-01.jpg. You could change this in your local environment. Then, in the end, you could see the result in the ~/Desktop folder under image.jpg.
Example result:
- Input:

- Output:

As you can see, in the output image it is clear where are the edges of the input picture.
Notice that this result is totally related to the values we used for the thresholds in the Python code. Look at the next example:
- Input:

- Output with:
# code inside the main() function

# CONSTANTS
THRESHOLD1 = 20
THRESHOLD2 = 60
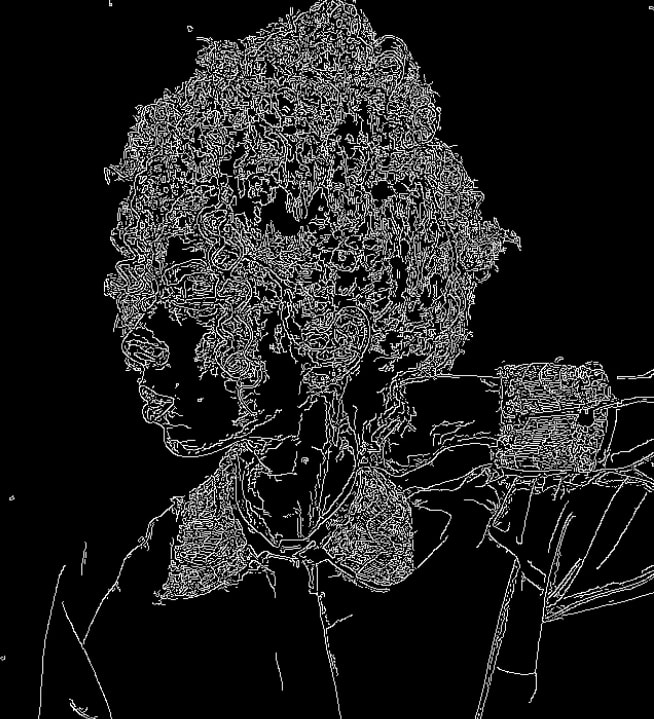
- Output with:
# code inside the main() function

# CONSTANTS
THRESHOLD1 = 100
THRESHOLD2 = 300

As you can see, with those different weights we get different results. I would recommend you to test those values first with your images and later update the code to use your tuned values.
Also, as a continuation idea, it would be cool if the user could send those threshold values through the request.
Recommendation: as a rule of thumb, always set the bigger threshold as three times the value of the small threshold.
After setting the code and testing locally, the final step is to publish this Azure Function. To do it you first need to have an Azure account and the Azure CLI tool installed.
Now you must first log in using the CLI with:
$ az login
After using this command a new window will open in your browser and you'll be prompted to login in your Azure account. Just follow those instructions.
The next step is to create a resource group for your Azure Function services. You can do it with the following commands in the CLI:
# select some location near to you
# use this command to see all the available locations
# az account list-locations
$ az group create --location "East US 2" --name "dev-azure-hackathon"
Next step is to create a storage account for your application. You can easily do it with the following command:
# this storage name must be unique in the whole world
# I recommend using the following pattern
# storagecv<MMDDYYYY>
# where MM stands for the month
# DD stands for the day
# YYYY stands for the year
$ az storage account create \
  -n storagecv02202022 \
  -l "East US 2" \
  -g "dev-azure-hackathon" \
  --sku Standard_LRS
After creating the storage account, the next step is to create the Azure Function itself. You could create it using the following command:
$ az functionapp create \
    --consumption-plan-location eastus2 \
    --runtime python \
    --runtime-version 3.8 \
    --functions-version 3 \
    --name opencvhttptrigger \
    --resource-group dev-azure-hackathon \
    --os-type linux \
    --storage-account storagecv02202022
Finally, the last step is to publish our Azure Function using the following command:
$ func azure functionapp publish opencvhttptrigger
In my local development scenario, the first time I used this command it did not work properly. At least I did not get the expected result. But in the second run everything worked fine.
Now you can go for your Azure UI portal in this URL. There you need to log in to your account (the same you used in the CLI) and search in the top bar for the resource group you have created before.
There you'll see the services you created through the CLI:

Next step is to click in your function app to open its specific page. Now, in the left menu, click in the Functions button. There you must assert that your Azure Function is there:
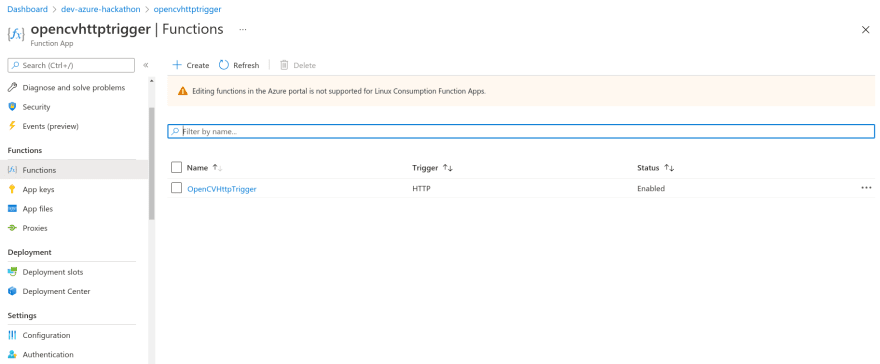
In this page, first click on the function name in order to access its page.
Now, click in the Get Function URL in the top menu. In this part you can specify which authorization key you want to use.


Finally, just copy this link and update the URL you used to test this project locally to use the Azure link. That's it.
Now you have an Azure Function deployed where you can send an image and get its detected edges. Pretty cool!
Submission Category:
- Computing Captains.
On this project I used basically just Azure Functions and its related services.
Link to Code on GitHub
{% github https://github.com/64J0/AzureFunctions-OpenCV %}
Additional Resources / Info
Finally, in this section I'll just share some additional resources and some links that I used while developing this project.
First, with OPENCV WITH AZURE FUNCTIONS I understood how to get started using OpenCV along with Azure Functions in Python. This article is pretty clear and show commands to run the project using the CLI tool, which is pretty awesome in developing phase.
Also, I would like to congratulate people that write docs. Although it is not perfect and sometimes pretty tricky to find the information I want, the Python manual for developing Azure Functions is very good. You can access it through this link.
Apart from those, there are some cool references in the code script in comments. You can check it later to understand better where some ideas come from.
Last thing I want to present is a demo video I recorded to show how this project works. Take a look here:
{% embed https://youtu.be/GKwS6sofgo8 %}