How to publish a NuGet package using dotnet CLI
Disclaimer: This post was originally posted in Medium. Link.
Introduction
In this post, I’ll teach you how to publish a NuGet package using the .NET CLI to make it available to be downloaded and used by other people around the world.
I got the motivation to write this article after trying to find some tutorials on how to make a NuGet package and, I noticed that, most of those are for Visual Studio users in the Windows environment, and this does not fit my needs since I use Ubuntu, a free operating system that uses the Linux kernel.
This is a pretty common situation which affects lots of developers that want to contribute to the open source community.
Now, I´ll explain what steps to take. First, you develop your tool locally. Then, you´ll need to pack it and deliver it to a package management platform, like npm for Node.js or NuGet for .NET projects.
To illustrate the process, I’ll be using a project I have recently started, that is called Fubernetes. My goal with it is to make it easier to craft Kubernetes YAML configuration by taking advantage of F#’s type system.
Disclaimer: This project is still in early development and lots of Kubernetes objects are not mapped yet.
Setup
During this tutorial, I’ll present the commands I have tested in a Linux Ubuntu environment. It is required to have the .NET CLI tool installed.
In my local environment I have these SDK’s installed:
dotnet --list-sdks

# 5.0.201 [~/dotnet/sdk]
# 5.0.401 [~/dotnet/sdk]
# 6.0.101 [~/dotnet/sdk]
But I expect it to work well if you have any version after .NET 5. To check if you have the required tool you can run the following command in a terminal:
dotnet pack --help

# Description:
#   .NET Core NuGet Package Packer
# ...
Finally, the last required piece is to have a .NET project. For testing purposes you could use the project I mentioned before (Fubernetes) or just stick with a Console application, adapting the commands.
Procedure
1 — After configuring your local setup, go for the NuGet page and create an account.
2 — Next step is to pack the project. Since this specific project does not depend upon external packages we could just run:
dotnet pack --configuration release Fsharp-K8s.Main/

# Microsoft (R) Build Engine version 17.0.0+c9eb9dd64 for .NET
# Copyright (C) Microsoft Corporation. All rights reserved.

#     Determining projects to restore...
#     All projects are up-to-date for restore.
#     Main -> ~/Desktop/codes/fsharp-k8s/Fsharp-K8s.Main/bin/release/net5.0/Fubernetes.dll
#     Successfully created package '~/Desktop/codes/fsharp-k8s/Fsharp-K8s.Main/bin/release/Fubernetes.1.0.0.nupkg'.
Now you could inspect the folder bin/release/ to see the generated binaries.
3 — Go back to the NuGet page, click on your name in the top right and click on API keys. You’ll need to generate a new key in order to use the terminal to upload your project binaries.
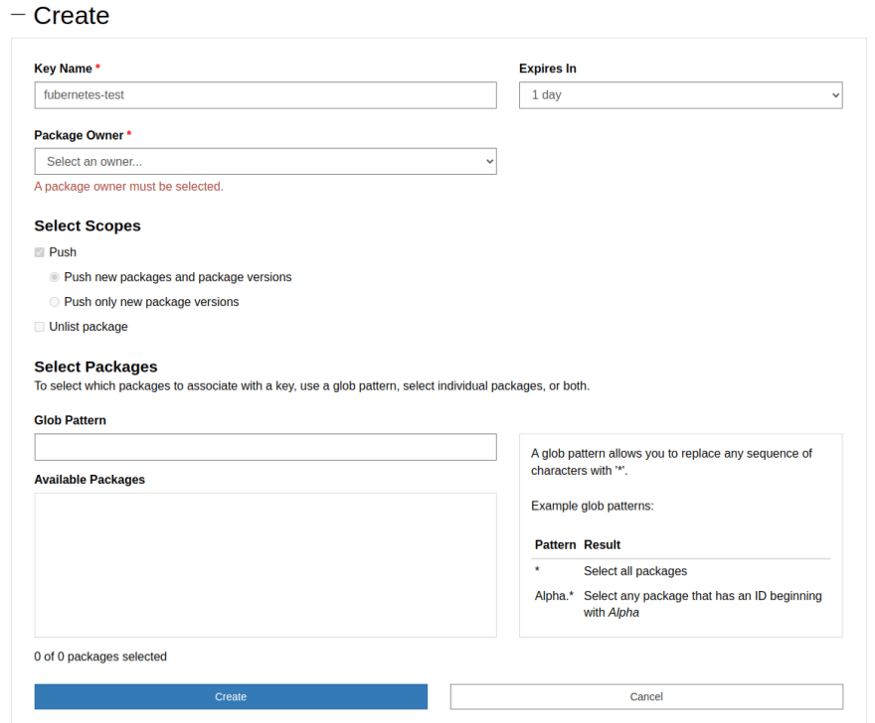
Continuing, click on + Create and this page will open for you to input the required values.

There, you should give your key a name, set a reasonable expiration date and select your account as the package owner. For testing purposes you could leave the default option for scopes selected: Push > Push new packages and package versions.
Since we do not have any package created yet, it is better to not set any additional rules for this API token. So, in glob pattern just put a * and hit the Create button.
Now you’ll be redirected to the key box similar to this one below:

There you can get the key by clicking on the copy button. Pay attention to this value since it gives permission to do anything in your account.
If you lost the copied key, you need to copy on the regenerate button and the copy will be there again.
Now, you can send your package to NuGet using this last command:
dotnet nuget push Fsharp-K8s.Main/bin/release/Fubernetes.1.0.0.nupkg --api-key <SECRET_KEY> --source https://api.nuget.org/v3/index.json
4 — Finally, it is just a matter of time until your package gets indexed and appears for everyone to download. During this time, it is submitted for several validations such as malware detection.
According to the docs, this should take 15 minutes at most, and after it finishes you’ll receive a confirmation e-mail.
Also, to check the package status, you can go for the NuGet platform again, click on your name in the top right, and hit Manage packages.
After some time, you’ll see it published like this:

Conclusion
In this article, I have covered all the steps required to publish a .NET package to NuGet using the dotnet CLI tool. I hope that, it is useful for you and makes it easier to develop new cool open source tools.
That’s it, see you later.
References
- How to create a NuGet package with the .NET CLI — Microsoft docs
- Publishing packages — Microsoft docs
- dotnet nuget push — Microsoft docs
This post was originally published at this link.
If you would like more information on Datarisk, access our Website, on www.datarisk.io.